How We Grounded Angry Birds AR: Isle of Pigs in Your Living Room (Part 2)
As I mentioned last week, there are many ways you can merge the virtual and real world when creating AR experiences including using shadows and ambient occlusion. Today, I'm diving into even more ways we grounded Angry Birds AR: Isles of Pigs into your living room or anywhere else you’d like to play it.
Color and light adjustments
This next category is about adjusting the color and lighting. We do this in four parts:
Using an estimated light intensity from the real world in the virtual world
Using an estimated light temperature from the real world in the virtual world
Using the environment texture as skybox
Coloring the real world based on the theme in the virtual world
Light intensity
Light intensity is about adjusting the lighting of the virtual objects based on the real world lighting conditions. This is generally a very subtle effect when it works, but very jarring when it doesn’t work.
This is what a level looks like when it is in a lit room:

And this is what the same level looks like when the real world light is switched off:

In Angry Birds AR: Isle of Pigs we have two lights in our lighting setup. A directional light and an ambient light. On ARKit we get a light estimation value between 0 and 1. But before we provide this estimation to the lights in our scene we actually tweak it slightly. So we have two curves where we input the ARKit light estimation and get a light intensity back which we can use for our lights. We had to tweak these two curves individually for the directional light and for the ambient light.
This is the curve we use for the ambient light intensity:

And this is the curve we use for the directional light intensity:

We also use this information to do a little Easter egg in the main menu. When the user switches the light off something unexpected will happen.
Light temperature
We also adjust the color of the lights, both ambient and directional, based on the light temperature estimation from the device. Again, we get a float value from the device, and from this device we sample a color ramp to get a color value.
This is what that color ramp looks like:

Using the environment texture as skybox
In ARKit we can get what is called an environment texture. During an AR gameplay session, ARKit samples the video and stitches together an environment texture. This can be used by reflection probes to pick up real world reflections in your virtual environment. This is a debug view of an environment texture:
Not only can this texture be used for reflection probes, but it can also be used as a skybox. Of course we don’t need to render a skybox since we’re rendering the video feed from the real world. However, in Unity, the skybox can be used to affect the lighting in the scene.
So we pass the generated environment texture on to our skybox, and let it affect the light in our scene. Here are two examples of where the environment texture helps merge the real and the virtual worlds.
Below are two screenshots with the same level placed in different real world environments.
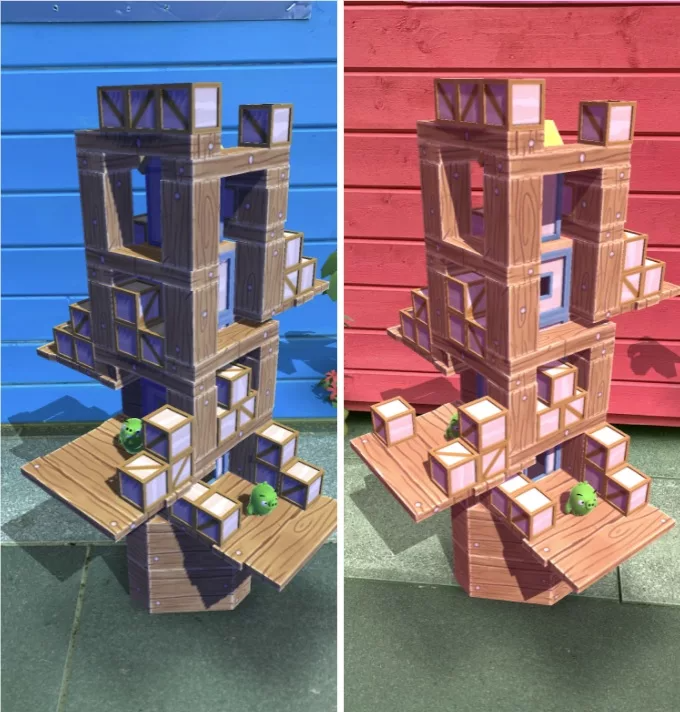
In the screenshots above the colors are exaggerated to show off the effect, and this technique has been very difficult to implement because the environment texture can sometimes be very bright and sometimes very dark. So while it can be used to great effect, it is also a tricky thing to control.
Coloring the real world
Another way to marry the real and the virtual world is to have the virtual world affect the look of the real world.
What that means is that each theme in the game has unique looks. There’s a sandy beach theme, a desert theme, a disco theme and a snow theme. Each theme has a color scheme that we also apply to the video feed in the background.
In the screenshot below you can see what the same video feed looks like in different themes in the game.

The video feed is provided to the game as two textures, both in the YCbCr color space. There is then a shader that converts from YCbCr to RGB, and it is this shader we modified to achieve this effect.
Basically the conversion takes the YCbCr color as a Vector4, multiplies that with a 4x4 matrix and then the resulting vector is the RGB color.
Here is the original shader:
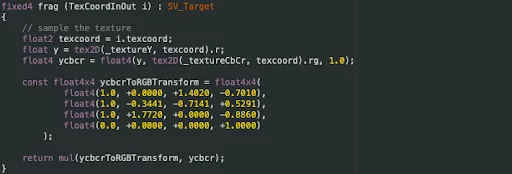
The only modification we did to the shader was expose the 4x4 matrix so we could modify it at runtime, and this is what it looks like:

A nice thing about this trick is that because the shader was already there, the only thing we’ve done is change the matrix, this effect is practically free from a performance point of view.
Particles
Particles floating around are a great way to signal spatial awareness to the player. When the user moves their phone around and they see snowflakes swirling by, there is a very immediate effect of wanting to move the phone around to look around and almost wanting to catch the falling snow flakes.
This effect is also very simple to add in your project too, it’s just a particle system. But the effect on the immersion is amazing!
Merging
Refraction
This is similar to colorizing the real world video feed in the sense that this effect actually modifies the visuals in the real world.
With the kind of AR that mobile phones provide, where we have the video feed accessible as a texture, we can use that texture to draw whatever we want.
In that video, check out the ice block at the top and how they actually refract the real world behind it. So the plants on the bookshelf in the background are refracted.
The technique is the same as any old refraction shader. What we do is:
Render the video feed as a background
Render all opaque objects, like opaque level blocks and pigs for example
Grab the render buffer and use it as a texture
Use the grabbed render buffer texture as input to the refraction shader
Success!
Occluder surfaces on peripheral planes
Do you remember the directional shadows from the start of this blog post? They are drawn on a transparent plane. That transparent plane is also writing to the depth buffer. That way we hide virtual objects that are below ground. We call these occluder surfaces. All the real world surfaces that the AR device finds get an occluder surface.
Under normal conditions this isn’t noticeable to players, we don’t want to hide the game level behind some props, and users normally don’t scan for AR surfaces outside of the playing area. But if they do they can create the illusion of real world objects occluding virtual objects. Like in this example:
Now, two and a half years after we launched Angry Birds AR: Isle of Pigs, some devices can actually detect the depth and apps can use that as a depth buffer in their games, effectively masking using anything in the real world. But for the lower spec devices this is still a good looking trick.
Performance
Speaking of performance for low spec devices. All these tricks come with a certain amount of cost. And added to that is the cost of running ARKit. So we need to housekeep our resources.
There are three different points of views when it comes to performance on mobile devices. Battery life, heat build up and frame rate.
Those three are all connected. Even if you’re staying within your 60 FPS budget you might push the hardware too much, and when that happens the device heats up and eat battery like there’s no tomorrow. When the device heats up the OS will start throttling performance, so then your frame rate will drop, even though you are not actually doing anything different. So the exact same conditions in the game can have different outcomes at different times based on the condition of the device. When you’re profiling your game it makes sense to profile under similar conditions of the device.
To address this you basically need to monitor the frame rate, and most importantly, heat, over time. If the device is slowly building up heat then at some point the device performance will get throttled.
What we did in this title was disabling features at runtime. When we start the app we assume the user wants all the bells and whistles. The OS can signal the app that heat is building up and when that happens we disable the most expensive features. If heat keeps building we disable more features until we’ve disabled everything that can be disabled. High spec devices can keep all the features for longer compared to low spec devices..
So if you can, build your game so it can dynamically scale back on expensive features.
Conclusion
There are quite a lot of tricks you can use to really merge the virtual and the real when developing this type of AR experience.
In the video below you can see what it looks like when all the different effects are applied individually and how they build up the complete picture.
And lastly, here is one of the first screenshots I could find of the game.

If you’re interested in working as a programmer on AR or other exciting projects at Resolution Games, check out our job openings. Some of our current openings below: